Swiftech H2O-120 Compact and Corsair Nautilus 500: Is Water Better?
by Wesley Fink on September 17, 2007 6:00 AM EST- Posted in
- Cases/Cooling/PSUs
Swiftech H2O-120 Compact
Swiftech specializes in cooling for the enthusiast market. It is probably best known for its liquid cooling solutions, but Swiftech began with air cooling and has also had a few air coolers that were very well-known, like their ongoing MC and MCX air coolers for AMD and Intel. Swiftech also markets thermoelectric cooling parts, specialty ram and MOSFET coolers, and even a specially modified Antec P180 case called the QPower P180 for water cooling.
The Company was founded in 1994 by Gabriel Rouchon, incorporated in 2001, and was first publicly traded in 2005. Though there have been many changes in the company's structure over the years, it is worth mentioning that Gabe Rouchon is still very active in Swiftech, and Gabe often works directly with reviewers on tweaking the company's cooling products.
Swiftech markets both individual cooling products such as CPU water blocks, chipset and VGA water blocks, pumps, radiators, reservoirs, and cooling accessories. They also market complete water cooling kits such as the H2O-220 Apex Ultra and the H2O-80 Micro. Their newest kit, the H2O-120 Compact is the subject of this review.

The complete H2O-120 Compact kit comes packaged in a small box measuring roughly 13x7x4 inches. Everything needed for a standard Intel or AMD installation is included in the package.

The radiator/reservoir and water block/pump are well protected by the cutouts in the rigid foam block. Components are located on both the top and bottom of the Styrofoam. If you can't find the funnel it's mounted on the bottom.

You can see how much Swiftech has simplified this water cooling system by looking at the small number of parts compared to traditional water cooling kits. The fan/radiator/reservoir is basically one module, and the water block/pump is the second module. These two components are connected by pre-cut 10" Neoprene 3/8" tubes. All of the hardware for mounting is included, such as the mounting screws, Intel backplate (shipped attached to the Apogee Drive Block), a 7V electrical connector for running the fan at low speed, Arctic Silver Ceramic thermal grease, and the water additive. An alternate mounting block is also included for AMD/AM2 processor mounting.
Swiftech does not include the distilled water required for filling the system. Specialty cooling etailers and scientific equipment shops carry this; however, the most readily available source for distilled water we found is Wal-Mart, where a gallon of distilled water was less than a buck. The coolant additive is mixed with a half liter (pint or 16 oz.) of distilled water.
Installation
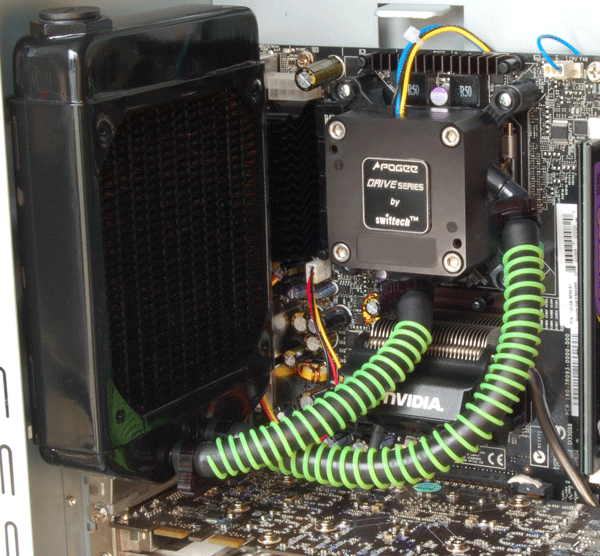
The kit mounts just fine in a full tower case, and it will mount fine in an Antec P180 which mounts the power supply at the bottom of the mid-tower case. The kit as supplied did fit any bottom-mount mid-tower case available for testing. However, the Swiftech H2O-120 Compact kit would not fit any top-mount power supply mid-tower case we tried. This included about six different brands of the most common top-mount PSU cases, either premium or value brands. The radiator is about a half inch too long to mount in top PSU mid-tower cases. Those equipped with 120mm exhaust fans all had screw holes that would not allow mounting of the radiator.
Both our old and new cooling test beds are top PSU mid-tower cases, and the H2O-120 Compact would not fit either case as supplied. We used that configuration because this is the case design readers most often own - it is the most common case available and accounts for the most sales. To be fair to other solutions, it was possible to find a way to install the H2O-120 Compact in the test bed case, so we could advise readers of what was needed to mount in this common design.
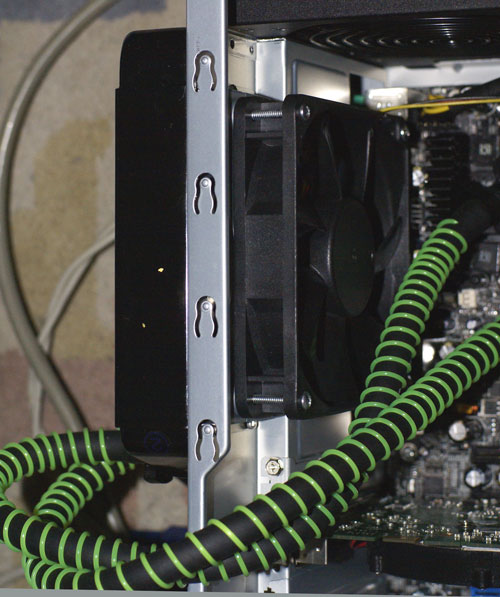
The easiest mount was a split design, where the radiator was mounted outside the case and the fan is inside the case. To use this mount you will need longer screws in some mid-tower cases and a longer pair of hoses. We found the 12" length worked fine in our case, and extra hoses are available from Swiftech.
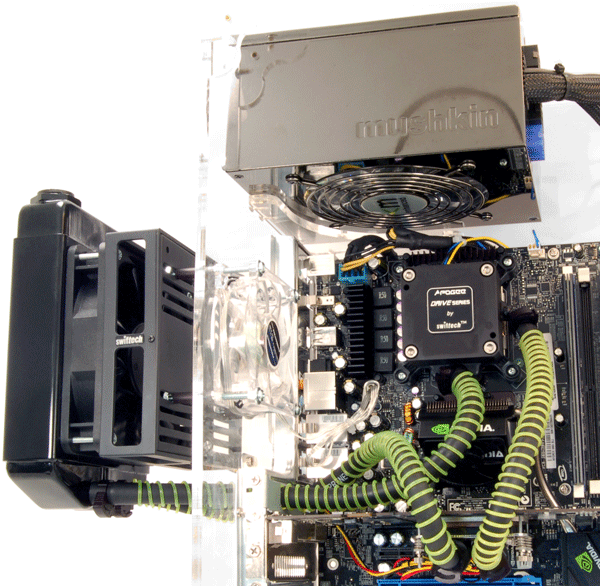
When there is not enough room for the radiator, Swiftech recommends using their "Radbox" for external mounting.
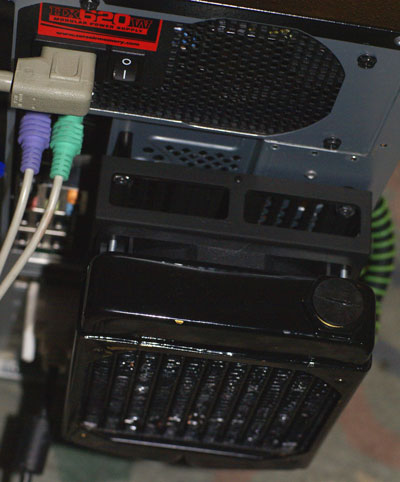
You will also need longer tubing for the Radbox install, but all the necessary screws and washers come with the Radbox from Swiftech. The Radbox kit even includes a PCI slot cover for running tubing to the outside of the case for external radiator mounting.
Performance tests were run with both the split-install configuration and the recommended Radbox external configuration. Cooling results were all but identical; the recommended external install was 0C to 2C cooler at most speeds. If your 120mm grill is not perforated enough you may have to remove the fan circle for best cooling, but the kit cooled fine on our test bed with the perforated 120mm grill intact.
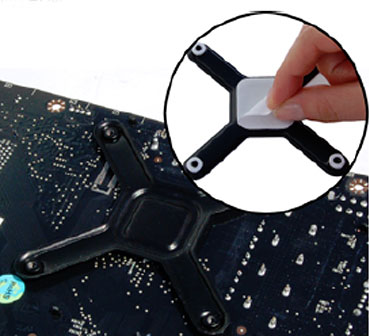
Once you have determined fit and decided on how you will mount the H2O-120 Compact you will need to assemble and leak test the water cooling system. The Intel 775 block requires a back plate so you will have to remove the motherboard to install the water cooling system. It was easiest for us to stick or tape the back plate to the motherboard and remount it for final install, because we strongly advise testing for leaks before mounting the system over the motherboard.

In a standard install everything is inside so you can attach the tubes, fill the system and operate the pump away from the computer. The manual includes information on how to run the power supply to test the system, before it is installed on the motherboard.

On the installs with the radiator outside the case you will have to plan assembly and water testing, since the water system should be filled after the tubes are passed through the PCI slot. The tubes for external mount were long enough that the Apogee block could dangle from inside the case to the outside for filling and leak testing. The apogee block was dangled over the back on a dry cloth for leak-testing where the tubing needed to pass though the PCI bracket.
The bottom line on installation is that the standard install is relatively simple, and it is definitely much simpler than the traditional four component water cooling systems. If you are a first-time water cooling installer and the system fits your case, 30 minutes is probably a reasonable time to install. However, if you are installing in a top PSU mid-tower case you will need to buy or order parts, carefully plan your install, and it will take an hour or more to install the system once your parts arrive. The penalty for a sloppy install without leak testing could be a dead motherboard and CPU, so we strongly recommend that you take your time and use the precautions necessary to assure you have a leak-proof water system.
Swiftech specializes in cooling for the enthusiast market. It is probably best known for its liquid cooling solutions, but Swiftech began with air cooling and has also had a few air coolers that were very well-known, like their ongoing MC and MCX air coolers for AMD and Intel. Swiftech also markets thermoelectric cooling parts, specialty ram and MOSFET coolers, and even a specially modified Antec P180 case called the QPower P180 for water cooling.
The Company was founded in 1994 by Gabriel Rouchon, incorporated in 2001, and was first publicly traded in 2005. Though there have been many changes in the company's structure over the years, it is worth mentioning that Gabe Rouchon is still very active in Swiftech, and Gabe often works directly with reviewers on tweaking the company's cooling products.
Swiftech markets both individual cooling products such as CPU water blocks, chipset and VGA water blocks, pumps, radiators, reservoirs, and cooling accessories. They also market complete water cooling kits such as the H2O-220 Apex Ultra and the H2O-80 Micro. Their newest kit, the H2O-120 Compact is the subject of this review.

The complete H2O-120 Compact kit comes packaged in a small box measuring roughly 13x7x4 inches. Everything needed for a standard Intel or AMD installation is included in the package.

The radiator/reservoir and water block/pump are well protected by the cutouts in the rigid foam block. Components are located on both the top and bottom of the Styrofoam. If you can't find the funnel it's mounted on the bottom.

You can see how much Swiftech has simplified this water cooling system by looking at the small number of parts compared to traditional water cooling kits. The fan/radiator/reservoir is basically one module, and the water block/pump is the second module. These two components are connected by pre-cut 10" Neoprene 3/8" tubes. All of the hardware for mounting is included, such as the mounting screws, Intel backplate (shipped attached to the Apogee Drive Block), a 7V electrical connector for running the fan at low speed, Arctic Silver Ceramic thermal grease, and the water additive. An alternate mounting block is also included for AMD/AM2 processor mounting.
Swiftech does not include the distilled water required for filling the system. Specialty cooling etailers and scientific equipment shops carry this; however, the most readily available source for distilled water we found is Wal-Mart, where a gallon of distilled water was less than a buck. The coolant additive is mixed with a half liter (pint or 16 oz.) of distilled water.
Installation

The kit mounts just fine in a full tower case, and it will mount fine in an Antec P180 which mounts the power supply at the bottom of the mid-tower case. The kit as supplied did fit any bottom-mount mid-tower case available for testing. However, the Swiftech H2O-120 Compact kit would not fit any top-mount power supply mid-tower case we tried. This included about six different brands of the most common top-mount PSU cases, either premium or value brands. The radiator is about a half inch too long to mount in top PSU mid-tower cases. Those equipped with 120mm exhaust fans all had screw holes that would not allow mounting of the radiator.
Both our old and new cooling test beds are top PSU mid-tower cases, and the H2O-120 Compact would not fit either case as supplied. We used that configuration because this is the case design readers most often own - it is the most common case available and accounts for the most sales. To be fair to other solutions, it was possible to find a way to install the H2O-120 Compact in the test bed case, so we could advise readers of what was needed to mount in this common design.

The easiest mount was a split design, where the radiator was mounted outside the case and the fan is inside the case. To use this mount you will need longer screws in some mid-tower cases and a longer pair of hoses. We found the 12" length worked fine in our case, and extra hoses are available from Swiftech.

When there is not enough room for the radiator, Swiftech recommends using their "Radbox" for external mounting.

You will also need longer tubing for the Radbox install, but all the necessary screws and washers come with the Radbox from Swiftech. The Radbox kit even includes a PCI slot cover for running tubing to the outside of the case for external radiator mounting.
Performance tests were run with both the split-install configuration and the recommended Radbox external configuration. Cooling results were all but identical; the recommended external install was 0C to 2C cooler at most speeds. If your 120mm grill is not perforated enough you may have to remove the fan circle for best cooling, but the kit cooled fine on our test bed with the perforated 120mm grill intact.

Once you have determined fit and decided on how you will mount the H2O-120 Compact you will need to assemble and leak test the water cooling system. The Intel 775 block requires a back plate so you will have to remove the motherboard to install the water cooling system. It was easiest for us to stick or tape the back plate to the motherboard and remount it for final install, because we strongly advise testing for leaks before mounting the system over the motherboard.

In a standard install everything is inside so you can attach the tubes, fill the system and operate the pump away from the computer. The manual includes information on how to run the power supply to test the system, before it is installed on the motherboard.

On the installs with the radiator outside the case you will have to plan assembly and water testing, since the water system should be filled after the tubes are passed through the PCI slot. The tubes for external mount were long enough that the Apogee block could dangle from inside the case to the outside for filling and leak testing. The apogee block was dangled over the back on a dry cloth for leak-testing where the tubing needed to pass though the PCI bracket.
The bottom line on installation is that the standard install is relatively simple, and it is definitely much simpler than the traditional four component water cooling systems. If you are a first-time water cooling installer and the system fits your case, 30 minutes is probably a reasonable time to install. However, if you are installing in a top PSU mid-tower case you will need to buy or order parts, carefully plan your install, and it will take an hour or more to install the system once your parts arrive. The penalty for a sloppy install without leak testing could be a dead motherboard and CPU, so we strongly recommend that you take your time and use the precautions necessary to assure you have a leak-proof water system.


58 Comments
View All Comments
EODetroit - Tuesday, September 18, 2007 - link
The above is the best comment here. In the end, its all about heat radiation. If the air coolers have a better means for radiating heat than the water coolers, they'll win. Water usually did well because it radiated the heat outside the case and most importantly, they could have bigger radiators than the little HS&F inside the case.With the modern high end air coolers, the radiators are huge (even if they're inside the relatively hot case). With the water cooler setups you tested, the radiators are small (small for a water radiator, even if its radiating to the outside air). Therefore you don't really need to see the numbers to know what the result will be.
To take advantage of water cooling, you need a big time radiator on the outside of the case... preferably with large fans that can push a lot of air through them without making a lot of noise. By testing radiators the size of a 120mm fan, you negate water cooling's biggest advantage.
Lem - Wednesday, September 19, 2007 - link
I kinda agree but...I somewhat disagree with the reasoning because heatpipes transfer heat a lot better than the water tubes we see used with water cooling systems.
The only benefit of water cooling is basically the fact that you can transfer heat longer distances. This allows you to take advatage of big external heat sinks.
If there were long and flexible heatpipes out there, we would not even consider water.
GhandiInstinct - Monday, September 17, 2007 - link
We need more important articles like these, as well as DDR2 comparisons and GPU comparisons....Anyway, I have one minor complaint, I wish the line graphs would be done away with as well as maybe labeling the names with a (AIR) and (WATER) so we know which performs best :)
(It's very hard to tell with the line graph)
Jethrodood - Monday, September 17, 2007 - link
I cant believe such a long standing tech site would draw such naive conclusions in the realm of cpu cooling. /scratches head..JAG87 - Monday, September 17, 2007 - link
This has to be one of the worst articles ever. It was decent until the very last page, where conclusions are drawn based on two cheap beginner water cooling kits, and one test platform.First, don't say water cooling is bad when testing beginner All-in-one test kits. These are cheap, and they perform as much as they cost.
And second, try keeping an over clocked quad core below 60c at load with air cooling. Take a 3.6 to 4 Ghz quad, thats 200W of heat. Try cooling that with air, just try.
And you don't have to spend more than 300 for water cooling to beat air cooling. Example: Apogee GTX/Dtek Fuzion + MCR220/MCR320 + MCP655 + MCRES MICRO + 7/16ID tubing + a few zip ties = way less than 300 dollars.
Why don't you split your review into pricing categories, and then you can draw a conclusion for each price category, instead of calling shens on water cooling. Make a sub 200 dollar section, a 200-300 dollar section, and a 300+ section, and run tests for each. Then you can say, hey sub 200 kits are a waste of money, 200-300 kits are the sweet spot for CPU cooling, and 300+ kits are only for people who wish to water cool more than just the CPU.
Come on Wesley, we expect better from Anandtech.
oopyseohs - Monday, September 17, 2007 - link
And second, try keeping an over clocked quad core below 60c at load with air cooling. Take a 3.6 to 4 Ghz quad, thats 200W of heat. Try cooling that with air, just try.QFT
I am by no means an advocate of water cooling, but I do appreciate the ability of water cooling to dissipate greater quantities of heat faster than air cooling. Maybe not faster (which is why you're getting better scores on a low TDP X6800), but more. I have tested the H20-120 Compact on QX6850's with Gabe and it's superiority to even the best air coolers is quite evident - even though it has just a single 120mm radiator.
While I don't think this is "one of the worst AnandTech articles ever", as a previous poster so delicately put it, I think it does bring to light an important flaw in your testing methodology for coolers: that the Core 2 Duo just does not generate anywhere near the heat of the increasingly-common Core 2 Quad.
strikeback03 - Wednesday, September 19, 2007 - link
I'm currently typing on a system with a Q6600 on an MSI P35 Platinum board with the jumpers set to the 333 bus speed, giving a 3.0GHz quad core. Tuniq tower at around 1400RPM, running quad Prime95 Speedfan shows core temps in the mid 50*C range.rallycobra - Monday, September 17, 2007 - link
does anyone have actual temp data to support this? At some point does the aircooling show a non linear response to additional heat and the temp shoots much higher than water cooling? I'm not sure how this is possible.rallycobra - Monday, September 17, 2007 - link
I disagree. This is an excellent article. An $80 Thermalright 120 ultra has better thermals/noise/cost/install. And no chance of a catastrophy with fluid! If the data is reliable, and I believe it is, there is no sense in anyone spending $150 on either of these kits.I was thinking of getting the swiftech kit, since other reviews from less credible sources said it was better than any air solution, and then upgrading the radiator to a thermochill 120.3 and keeping the apogee drive. That is a $150 radiator with a $100 cpu block/pump.
It appears to me that you need to budget about $300 for fluid to be better than air. If you are going to go through the effort, go big or don't bother. I'm talking a huge radiator. If swiftech releases a kit with a 120.2 radiator for the same price, that may make sense.
Calin - Monday, September 17, 2007 - link
Because this was a review of a pre-made, as-sold water cooling setup. You mentioned he compared installation time with the air coolers?The $50 and 15 minutes of installation for a top-end air cooler, compared to the hassle of buying all the afore-mentioned components and fitting them, for a $300 price point (maybe?)
I'd say he got the right conclusion, and the article was sound. It was not intended to the water cooling experts, but to people that would (maybe) choose a somewhat simple to install $150 solution instead of a simple to install $50 solution.
By the way, in all the list you put (Apogee GTX/Dtek Fuzion + MCR220/MCR320 + MCP655 + MCRES MICRO + 7/16ID tubing + a few zip ties), I only know for sure what zip ties are.